Jaffster wrote:Can I place this here as a WIP? I can't keep personal documents on the work machine, I will update over the next week or two.As detailed here:
http://www.talkphotography.co.uk/forums/showthread.php?t=142847 I thought I’d take a quiet afternoon in the office to write a detailed description on the very basics of photography such as Aperture, ISO, DoF (Depth of Field), shutter speed and exposure.
I’d like to start this guide by stating that I am no expert with a camera, it’s purely a hobby for me and even though maybe I don’t cover certain things in this guide, this is meant for a complete newbie. I’ve only been into photography for just over a year and I can remember quite clearly the things that confused me and what I found difficult to get to grasps with. I’ve tried to put things as simply as possible
[SIZE="4"]Shutter speed[/SIZE]I think that this is a great place to start as your shutter speed is the core part of a photo. Other things such as Aperture and ISO allow you to vary your shutter speed but I shall go into details on this later on.
The basic principle of your ‘shutter speed’ is; the longer your shutter is open (slower shutter speed), the brighter your photograph. Inside your DSLR camera is a sensor, infront of that is a mirror which is what brings the image to your Viewfinder. When you press the shutter button on your camera, the mirror flicks upwards resulting in the light and image from your lens hitting your sensor. This is how the picture is formed. Your shutter speed is simply the amount of time that the mirror stays up or how long ‘Your shutter is open/exposed’.
Shutter speeds are measured in seconds and split-seconds, most basic DSLR cameras will allow you anywhere between 1/4000 and 30 seconds long ‘exposures’. Depending on the lighting will depend what sort of shutter speed you require. A 30 second ‘exposure’ taken on a sunny day will just result in a WHITE picture, likewise a 1/4000 ‘exposure’ taken in the pitch black will just result in a BLACK picture.
[SIZE="3"]Exposure [/SIZE]There’s certain rules which you can apply to your photography which will help you best determine your shutter speed. This is the ‘Sunny 16 rule’ -
http://en.wikipedia.org/wiki/Sunny_16_rule The sunny 16 rule is a great estimate for choosing your shutter speed but it isn’t always accurate, most DSLR cameras come with an exposure bar (I only see it on my camera when it’s set to the ‘Manual’ mode) which is a great representation of how the shot will come out. It will look something like this:
<.-2…l…-1…l…0…l…1…l…2.>
You will see an arrow moving around above the numbers. This is letting you know what your ‘exposure’ is or less technically, how bright your picture will be. -2 and below will be very dark. +2 and above will be too bright and blown out. To brighten the picture (to get from -2 to 0) you need to lengthen your shutter speed, to darken the picture (to get from +2 to 0) you need to shorten your shutter speed. You should be aiming for the ‘0’ and whilst other factors such as Aperture and ISO can have an effect on this, your shutter speed should be your bread and butter and if you’re completely new to photography then I would recommend using the ‘S’ function on your camera which allows you to control the shutter speed but leaves the camera in control of everything else. Use this until you’re comfortable with adjusting your shutter speed accordingly.
[SIZE="3"]Metering mode[/SIZE]One thing to consider when using the above exposure meter is your ‘metering mode’. I know with my camera by default it is set to ‘spot metering’. This means that the exposure meter will judge how bright/dark the area is around the ‘spot’ when looking through the viewfinder. The ‘Spot’ is the circle in the middle of your view. Using the ‘spot metering’ is probably the best to learn with as you’ll learn about exposing your images for different things. Sunsets are a good example. It’s nearly impossible to capture a sunset and get detail in the ground. The ground is usually a silhouette because the ‘spot’ was on the sun and you have adjusted your shutter speed according to the brightness of the sun. With the ground being a lot darker a much longer shutter speed would be required to pick up the light range and details from the ground, but this would just completely blow the skies out! It’s a catch 22 in situations like these.
Learn with ‘Spot metering’, once you’ve got the hang of it I would start to experiment with other metering modes, there’s a great reference here:
http://en.wikipedia.org/wiki/Metering_mode[SIZE="3"]“Subjects are blurring, help!”[/SIZE]You may well find that whilst trying to capture a moving subject in poor lighting your pictures will come out blurred. This is because the subject has moved a small amount between your shutter opening (remember, the mirror going up and allowing the light through) and your shutter closing. To prevent this there’s several things which you can do. Increasing your ISO will aid in a faster shutter speed and widening your aperture will give the same effect (we will talk about these in the next sections). You may also use a flash but this can result in some pretty horrid pictures unless you purchase a decent flashgun and is pretty pointless if your subject isn’t right infront of you as the light will only reach a certain distance.
Another problem which can cause blurring is also 'camera shake'. Certain cameras and certain lenses have built in features to help prevent this such as the Canon 'IS' system (Image stabilisation) or Sony's 'SuperSteadyShot'. When a slow shutter is used and you move during the length of the exposure you may find your images blurry or smudged. The only way to eliminate this is by using a tripod and either a remote shutter or a two second timer (so the movement of your finger pressing the shutter button doesn't actually move the camera in anyway). There are techniques you can use, I've read over and over on the TP forums that tucking your elbows in can help prevent some camera shake, also resting your elbows on something sturdy can help too but this is only going to work for quite fast shutter speeds. Tripods are your savior here.
---------------------------------------------------
[SIZE="4"]Aperture Part 1 - How it works and how it effects shutter speed and exposure[/SIZE][SIZE="3"]
What is Aperture?[/SIZE]
Now this is were things get interesting. You can buy a £1,000 DSLR and get 'point and shoot' quality pictures if you're not in control of your aperture. I know as I've been there.
I bought my Sony A300 after owning a point and shoot for a while and spent weeks scratching my head over why my images looked pretty much the same as my point and shoot snaps. It was only then that I actually started doing some reading. I still, to this day, regularly shoot in the 'A' setting on my camera or the 'Aperture priority' mode. This allows you to control the aperture whilst the camera retains control of the shutter speed.
So, I should talk about how it works? I'll start with lenses. If you purchased a DSLR you probably got a kit lens with it. Mine is a 18-70mm f/3.5-f/5.6. What does all this mean? Well, the 18mm-70mm is pretty self explanatory, this is the focal length available. 18mm is wide angle and 70mm is zoomed. The numbers afterwards? This is the widest aperture at that focal range, so:
An 18-70mm f/3.5-f/5.6
@ 18mm your widest aperture is f/3.5
@ 70mm your widest aperture is f/5.6
If you're new to aperture then you're more than likely still scratching your head on what this means, I'll get to the nitty-gritty stuff now.
Aperture is measured in 'F stops'. That's the 'f', for example 'F stop 3.5'.
With your kit lens, remove the caps from either end and look into the lens from the front. You'll see a small hole of light, now zoom the lens out but keep looking into it and you'll see the parts moving inside. The little light you see is actually your aperture. A brief check describes the word aperture as '
a hole or opening in which light travels through'. Now here comes the really confusing part.... a lower 'f stop' number means a WIDER aperture. A higher number is a NARROWER aperture. To clear it up:
F/3.5 - WIDE
F/11 - NARROW
This really confused me when I first started to learn about aperture. If you're confused here.... re-read it as it'll only get worse!
[SIZE="3"]
What does Aperture do to my picture?[/SIZE]
Aperture is possibly the most important part of getting a
good shot as it affects your shutter speed and most importantly your
Depth of Field (I shall go into details later).
Going WIDE with your aperture (f/3.5 for example) means that the hole in your lens which the light passes through is bigger than at say f/10. This results in more light getting into the lens allowing you to increase your shutter speed. Here's an example:
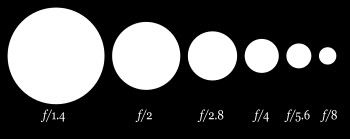
The lower the number = the wider the aperture = the more light gets to the sensor.
[SIZE="3"]Using Aperture to manage your shutter speed[/SIZE]When I spoke about Shutter speed, I mentioned that your pictures may blur in low light and spoke about camera shake. I also mentioned that there were ways to get a faster shutter speed, now you know one of them

Widen that aperture to allow more light through. You'll notice that as you widen the Aperture, your camera will detect the change in exposure and your exposure meter will start to move requiring you to increase your shutter speed. Remember this? :
If controlling both the shutter speed AND aperture at the same time is a bit much for you then i recommend using the 'A' function on your camera. This will allow the camera to decide the shutter speed and you choose the aperture. This is particularly handy for when you're shooting certain subjects and you don't have time to compose your shot properly. You also get to mess around with DoF (Depth of Field) which we shall talk about in part 2.
[SIZE="4"]Aperture Part 2 - How Aperture affects Depth of Field (DoF)[/SIZE]TBC